Home >>
Showing posts with label Blogger Tips. Show all posts

How to remove Newer posts - Home - Older posts from Blogger

How to remove "Newer Post" "Home" "Older Post" Link from Blogger Template

How to remove
  1. Log into your Blogger account and go to Dashboard > Design > Edit HTML.
  2. Check the Expand Widget Templates check box.
  3. Back up your template first.
  4. Find the HTML code below:
    <b:includable id='nextprev'>
    <div class='blog-pager' id='blog-pager'>
    <b:if cond='data:newerPageUrl'>
    <span id='blog-pager-newer-link'>
    <a class='blog-pager-newer-link' expr:href='data:newerPageUrl'
    expr:id='data:widget.instanceId + "_blog-pager-newer-link"'
    expr:title='data:newerPageTitle'>
    <data:newerPageTitle/></a>
    </span>
    </b:if>

    <b:if cond='data:olderPageUrl'>
    <span id='blog-pager-older-link'>
    <a class='blog-pager-older-link' expr:href='data:olderPageUrl'
    expr:id='data:widget.instanceId + "_blog-pager-older-link"'
    expr:title='data:olderPageTitle'>
    <data:olderPageTitle/></a>
    </span>
    </b:if>

    <b:if cond='data:blog.homepageUrl != data:blog.url'>
    <a class='home-link' expr:href='data:blog.homepageUrl'><data:homeMsg/></a>
    <b:else/>
    <b:if cond='data:newerPageUrl'>
    <a class='home-link' expr:href='data:blog.homepageUrl'><data:homeMsg/></a>
    </b:if>
    </b:if>

    </div>
    <div class='clear'/>
    </b:includable>

  5. Just remove the RED code shown above and do not delete the BLUE codes.
  6. Click Save Template. Click View Blog to preview your blog.
Read full entry... How to remove Newer posts - Home - Older posts from Blogger

Adding SEO Friendly Meta Tags to Blogger Template

What are Meta Tags
Meta tags are a great way to provide search engines with information about our blogs/sites. Meta tags can be used to provide information to all sorts of clients, and each system processes only the meta tags they understand and ignores the rest.

Meta tags are used for Search Engine Optimization (SEO). The two most critical meta tags used in SEO are: description and keywords. These are sometimes used by search engines to place the pages in the search directory, and they are used to provide a short description of the Web/Bog page in the search engine results.

meta tags


Here is the way to write meta tags which used for SEO friendly on our blogger HTML.
  1. Log into your Blogger account and go to Dashboard > Design > Edit HTML.
  2. Check the Expand Widget Templates check box.
  3. Find this code:
    <title><data:blog.pageTitle/></title>
  4. Replace that code with this one:
    <b:if cond='data:blog.pageType == "index"'>
    <title><data:blog.title/></title>
    <b:else/>
    <title><data:blog.pageName/></title>
    </b:if>
  5. Then insert this code snippet under that title code:
    <meta expr:content='data:blog.pageTitle + " - Your Blog description here"' name='description'/>
    <meta expr:content='data:blog.pageTitle + ", Keyword 1, keyword 2, keyword 3, etc"' name='keywords'/>
    <meta content='INDEX, FOLLOW' name='ROBOTS'/>
  6. Click Save Template. Click View Blog to preview your blog with the new customized title tags for SEO friendly.
Read full entry... Adding SEO Friendly Meta Tags to Blogger Template

How to make auto read more of our Blog

If you want to be able to set up your Blog posts to automatically add a "Read More" link for articles in Category Blog or Section Blog Layouts like on this Blog so that the articles would all be the same length and they would line up just as pretty as you please. Here we show you how to create it in a simple steps.

auto read more of our blog

How to make Auto read more with Thumbnails of our Blogger Posts?
  1. Log into your Blogger account and go to Dashboard > Design > Edit HTML.
  2. Check the Expand Widget Templates check box.
  3. Find this code:
    <data:post.body/>
  4. Replace that code with this one:
    <b:if cond='data:blog.pageType != &quot;item&quot;'>
    <div expr:id='&quot;summary&quot; + data:post.id'><data:post.body/></div>
    <script type='text/javascript'>createSummaryAndThumb(&quot;summary<data:post.id/>&quot;);</script>
    <span class='rmlink' style='float:left'><a expr:href='data:post.url'>Read more... </a></span>
    </b:if>
    <b:if cond='data:blog.pageType == &quot;item&quot;'><data:post.body/></b:if>
  5. Then copy and paste this code above the </head> tag.
    <script type='text/javascript'>
    var thumbnail_mode = &quot;float&quot; ;
    summary_noimg = 400;
    summary_img = 400;
    img_thumb_height = 120;
    img_thumb_width = 120;
    </script>
    
    <script type='text/javascript'>
    //<=!=[=C=D=A=T=A=[
    
    /******************************************
    Auto-readmore link script, version 2.0 (for blogspot)
    (C)2008 by Anhvo
    visit http://en.vietwebguide.com to get more cool hacks
    ********************************************/
    function removeHtmlTag(strx,chop){
        if(strx.indexOf("<")!=-1)
        {
            var s = strx.split("<");
            for(var i=0;i<s.length;i++){
                if(s[i].indexOf(">")!=-1){
                    s[i] = s[i].substring(s[i].indexOf(">")+1,s[i].length);
                }
            }
            strx =  s.join("");
        }
        chop = (chop < strx.length-1) ? chop : strx.length-2;
        while(strx.charAt(chop-1)!=' ' && strx.indexOf(' ',chop)!=-1) chop++;
        strx = strx.substring(0,chop-1);
        return strx+'...';
    }
    
    function createSummaryAndThumb(pID){
        var div = document.getElementById(pID);
        var imgtag = "";
        var img = div.getElementsByTagName("img");
        var summ = summary_noimg;
        if(img.length>=1) {   
            imgtag = '<span style="float:left; padding:0px 10px 5px 0px;"><img src="'+img[0].src+'" width="'+img_thumb_width+'px" height="'+img_thumb_height+'px"/></span>';
            summ = summary_img;
        }
       
        var summary = imgtag + '<div>' + removeHtmlTag(div.innerHTML,summ) + '</div>';
        div.innerHTML = summary;
    }
    
    //]=]=>
    </script>
  6. Save Template and now your post will automatically created in auto read more on index page of your blog.
Read full entry... How to make auto read more of our Blog

Remove 'Showing newest posts with label' message

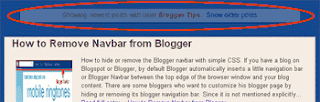
When we click on a label or do a search in a blogger blog we get a list of posts using that label or search term. Above the list of posts you will see a small message and link like this :

Showing newest posts with label

"Showing newest posts with label .... Show older posts"

How to Remove 'Showing newest posts with label' message?
  1. Log into your Blogger account and go to Dashboard > Design > Edit HTML.
  2. Check the Expand Widget Templates check box.
  3. Find the following Code in your blog HTML.
    Tips: Use Ctrl+F for quick search.
    <b:includable id='status-message'>
    <b:if cond='data:navMessage'>
    <div class='status-msg-wrap'>
    <div class='status-msg-body'>
    <data:navMessage/>
    </div>
    <div class='status-msg-border'>
    <div class='status-msg-bg'>
    <div class='status-msg-hidden'><data:navMessage/></div>
    </div>
    </div>
    </div>
    <div style='clear: both;'/>
    </b:if>
    </b:includable>
  4. Replace that code with the code below :
    <b:includable id='status-message'>
    <b:if cond='data:navMessage'>
    <div>
    </div>
    <div style='clear: both;'/>
    </b:if>
    </b:includable>
  5. Then Save Template and you're one.
Read full entry... Remove 'Showing newest posts with label' message

How to Remove Navbar from Blogger

How to hide or remove the Blogger navbar with simple CSS.
If you have a blog on Blogspot or Blogger, by default Blogger automatically inserts a little navigation bar or Blogger Navbar between the top edge of the browser window and your blog content. There are some bloggers who want to customize his blogger page by hiding or removing its blogger navigation bar.

disable navbar in blogger

Since it is not mentioned explicitly in the Terms of service for Blogger, it remains doubtful if removing and hacking the Blogger navbar is any violation of the Blogger terms of service. But lets say we are not "removing the navbar" but only "hiding the navbar" to get rid of the blogger nav bar.

Here are steps to hide or disable navbar in blogger:
  1. Log into your Blogger account and go to Dashboard > Design > Edit HTML.

  2. Check the Expand Widget Templates check box.
  3. Copy and paste this CSS code into the CSS section between HEAD tag of your Blogger template.
    CSS code:
    #navbar-iframe {
    display: none !important;
    }


    Or, use this code to remove an empty space in your webpages between the top edge of the browser window and your blog content. This CSS code tweak to remove the gap at the top.

    #navbar-iframe {
    height:0px;
    visibility:hidden;
    display:none!important;
    }

  4. Click Save Template. Click View Blog to preview your blog with no navigation bar on the top of your Blog.
Read full entry... How to Remove Navbar from Blogger

How to remove "Subscribe to Posts (Atom)" Link from BloggerTemplate

Do you want to remove "Subscribe to Posts (Atom)" link from your Blogger template?


If you dislike "Subscribe to Posts (Atom)" link to appear in your blog just follow these steps to remove it from your template.
  1. Log into your Blogger account and go to Dashboard > Design > Edit HTML.

  2. Click the Expand Widget Templates check box.
  3. Search for the following code in your template:
    <b:include name='feedLinks'/>
  4. Once you find the code, remove it and save your template. Refresh your blog and now the Subscribe to: Posts (Atom) link wont be there on your blog.
Read full entry... How to remove "Subscribe to Posts (Atom)" Link from BloggerTemplate